Integrate(Import) Excel Workbook(CSV,XLS) to CRM using Scribe Insight
If you have any doubt in the post please post comments. I will try to solve your problem.
using scribe with excel sheet we are going to integrate CRM contact
Open the scribe
Left side implies source system and right side would be destination. In our case source would be excel and right side would be CRM.
To create source click configure source. Configure source window open then we are going to create connection.There are lot of connections are available in CRM
- Adapter
- Database
- ODBC
- Text file
Here we are going to Text file and CRM adapter. In my later post we will see ODBC,webservice and SQL adapter.
Source system:
1. To create a new connection in the configure source click "Add" button.
2. To create a file source connection. Expand "TextFiles" and click Add/Modify text data source
Text wizard window open.
3. Fill DataSource name,Location and file extension if you are file is CSV,TXT,xslx. Check if you file has column name and click next button.
4. select the file in the wizard and click next button
5. In Text wizard step 3 is little bit tricky.In Excel all the column is by default take as string.
- Table Name:Give name of the table name
- Type:Make sure column must have same column type with destination system, if it is not then change "Type" drop down.Otherwise at the time of integration it throw error as column type is not valid.
- Precision: The column max value number is filled by default(. It is equivalent to column length in database. Make sure always source column and destination mapped column must have same length.
click ok button.
Column type:
6. Now file will be added in the connection pane.
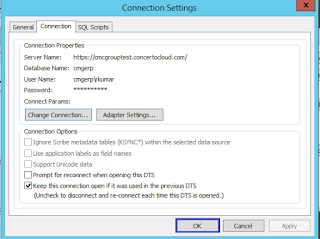
7. Select the new created source connection and click ok button.Connection setting window open
8. Click ok,automatically add this connection setting with connection manager window.
9. In the configure source window choose your connection settings.
Excel object is loaded in the table.You can also write sql query.
10. Click ok button.
Now our source system is ready. Then we are going to configure destination system.
Destination system:
Here we are going to configure steps. There are multiple steps possible.For example we can create a contact in one step and create customer in another step.
1. Click configure steps. Similar to source system click connection configure manager window open. Click Add connections.
Here we are going to select adapter. Expand the adapter and select Mircosoft CRM.
2. Double click the CRM adapter. Adapter login window will open.

3. click button and add in the connection manager.
4. Click close button and choose the CRM adapter. CRM adapter object will be loaded.
5. select the entity we are going to map. Here i am going to insert contact so i select contact. Choose the operation drop down to which step do you want to execute. Here i am going to select insert. If you choose update/insert then step will execute as check contact is there in CRM if already is there then update the contact if not then insert a contact.Click "Insert steps" button.
6. Now step is added in the system. If you have multiple steps then how and when the step will execute can control by configure in flow control tab. In later post you can see how will you configure multiple steps.
7. You can also configure before step execute what have to check by click formula editor in "pre-operation" section. For example Last name is mandatory so i will check is there last name is available or not if not then go to next line in the source.
Now source and destination system is ready.Then we are going to map the column from source to destination.
8. We mapped first name and last name in the system.
There are two icons in green colour.
- Tick - To validate the output not real transaction(not affect in CRM)
- Play - Real time.
9. To validate the output click "tick" icon, you can see the output window. In show first data in the excel object by clicking next button you can get consecutive data in the excel. In the right side pane you can see the corresponding output of the row and also you can check whether data is inserted or skipped in "Step result" tab.
- White colour in the steps shows the step is successfully execute the operation.
- Grey colur in the steps the row data is not valid.
10. Now we validated the output and then click play icon.
Click job summary you can see the summary of the report. N
If there is any error then you can click "transaction error". It will display error.
To get execution id in the transaction error window do below configuration.
Execution id is helpful to get the error log details in the database.


