Search This Blog

Friday, October 16, 2015

Field level security in CRM 2015

If you have any doubt in the post please post comments. I will try to solve your problem.

The Field Security column helps to quickly identity the behavior of the field towards field-level security by using the statuses below:
  • Disabled – Available for field-level security, but is presently not secured by an administrator
  • Not Applicable – Not valid for field-level security
  • Enabled – Attribute secured by an administrator


Limitation
There is one restriction regarding Boolean attributes to mention here. Since it is necessary to read the result of a Boolean attribute to be either Yes/No or True/False, you will not have the ability to restrict read access. You will only have the ability to restrict create and update access.

Monday, October 12, 2015

Limitation of Field level security in CRM

Limitation of Field level security in CRM

  •  Boolean attributes to mention here. Since it is necessary to read the result of a Boolean attribute to be either Yes/No or True/False, you will not have the ability to restrict read access. You will only have the ability to restrict create and update access.
  • Non applicable fields in CRM cannot be control by field level security. It can control by javascript code.

Friday, October 9, 2015

Retrieving the COM class factory for component with CLSID {E5CB7A31-7512-11D2-89CE-0080C792E5D8} failed due to the following error: 800703fa Illegal operation attempted on a registry key that has been marked for deletion.

Retrieving the COM class factory for component with CLSID {E5CB7A31-7512-11D2-89CE-0080C792E5D8} failed due to the following error: 800703fa Illegal operation attempted on a registry key that has been marked for deletion.


Solution:
Re-booted the CRM app server is fixed (V 5.0.9688.34)

Debug custom workflow in CRM

Debug custom workflow in CRM 

If you have any doubt in the post please post comments. I will try to solve your problem.

To debug the custom workflow in CRM on premises and online is different ways. 
CRM OnPremises
In CRM on-premises sever attach the below process to debug custom workflow.
  • w3wp.exe
  • crmAsyncService.exe
If the custom workflow is configured as "Async" then you have to attach both process in the visual studio and trigger the workflow

If the custom workflow is configured as "Sync" then you have to attach w3wp.exe process in the visual studio.
This is way can't be use in CRM online.

CRM OnLine
With the help of "plugin registration" we can debug the custom workflow.I have mentioned below the steps to debug it.

You must first define/register your custom workflow in the CRM by adding steps in your process.

Step:1 Open the plugin registration tool and connect to CRM online. Click install profiler if it not installed already


Step:2 Once you installed profiler you can select the plugins profiler and click "profile workflow"
Step:3 In profile settings window select your workflow in the workflow lookup and steps will be automatically populate check it. If steps is not populate then you have to use your custom workflow in the CRM and come again and do it. 


Step:4 Check the persist to entity and click ok button

Step:5 After click ok button. If the error occurs
"Automatic workflow cannot be published if no activation parameters have been specified" then you have to configure workflow in CRM as "OnDemand" to solve this error.

Step:6  Goto process now you can see your selected added with name embedded with profiled.


Step:7 Thats it.Now you can trigger the workflow.

Step:8 Once you triggered the workflow. Go to "plugin profiles" and open relevant plugin record.

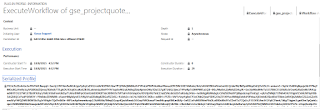
Step:9 Click on the “Serialized Profile” tab and copy the value specified in the “Serialized Profile”
.
Step 10. Create a new text file and copy the “Serialized Profile” value into it and then save the file.
Step 11. Go back to the Plugin Registration Tool, select the profile created earlier and click on the Debug button.

Step 12 In the opened Debug window, select the newly created text file in the Profile Location field and the Custom Workflow Activity assembly in the Workflow Activity field.

Step 13 Open your Custom Workflow Activity project using Visual Studio.

Step 14 Put the break point in your code and attach the debugger to the Plugin Registration Tool process and click the Start Execution button in the Plugin Registration Tool debug window.

The below steps are how to trigger the "OnDemand" workflow in the CRM

Step:1 Open any entity click "Run workflow"

Step:2 Select your custom workflow and click add now workflow get trigger


Manually trigger workflow in CRM

Manually trigger workflow in CRM

If you have any doubt in the post please post comments. I will try to solve your problem.

We can trigger the workflow manually through "Run workflow" ribbon item in CRM. Open any of the record in CRM and click "Run Workflow".

Select the workflow that we want to run and click add. Now workflow will trigger.


Thursday, October 8, 2015

Debug CRM for tablets in browser

Debug CRM for tablets in browser

If you have any doubt in the post please post comments. I will try to solve your problem.

The web browser can be used to leverage standard script debugging capabilities for the HTML 5 portion of CRM for tablets.
Login with CRM credentials into the following URL:

Syntax
https://orgname.crm.dynamics.com/nga/main.htm?org=orgname&server=https://orgname.crm.dynamics.com

orgname: Replace orgname in to CRM organisation name.

Example:
My organisation name in CRM is CRMDEMO
https://crmdemo.crm.dynamics.com/nga/main.htm?org=crmdemo&server=https://crmdemo.crm.dynamics.com


Wednesday, October 7, 2015

Sort the multiple column in CRM

Sort the multiple column in CRM

If you have any doubt in the post please post comments. I will try to solve your problem.

1. Click on the first column header
2. Hold down "shift" key
3. Click on the second column header

Tuesday, October 6, 2015

MyOrganizationCrmSdkTypes class generate using CrmSvcUtil.exe

MyOrganizationCrmSdkTypes class generate using CrmSvcUtil.exe
In CRM we can generate early-bound .NET Framework classes that represent the entity data model used by Microsoft Dynamics CRM by using CrmSvcUtil.exe.

You can get this exe from CRM SDK development tool kit.

Command to generate class from On-premises CRM
CrmSvcUtil.exe /url:http://<serverName>/<organizationName>/XRMServices/2011/Organization.svc    /out:<outputFilename>.cs /username:<username> /password:<password> /domain:<domainName>    /namespace:<outputNamespace> /serviceContextName:<serviceContextName>

 Command to generate class from Online CRM
CrmSvcUtil.exe /url:https://<organizationUrlName>.crm.dynamics.com/XRMServices/2011/Organization.svc    /out:<outputFilename>.cs /username:<username> /password:<password>     /namespace:<outputNamespace> /serviceContextName:<serviceContextName>
Example for online
CrmSvcUtil.exe /url:https://ASRworld.crm.dynamics.com/XRMServices/2011/Organization.svc    /out:MyOrganizationCrmSdkTypes.cs /username:@userName /password:@password


Data type supported in custom workflow activities in CRM

The following types are only supported in input and output argument.

  • Bool 
  • DateTime 
  • Decimal 
  • Double 
  • EntityReference 
  • Int 
  • Money 
  • OptionSetValue 
  • String 
Note:
Collection or Array of object as output parameter is not possible. But we can do entityreference list but that also not work when we map the multiple recipient in email.

Monday, October 5, 2015

Bring HTML web resource in CRM 2015 tablets and their limitations

Limitation of CRM 2015 tablets

Initially available for CRM Online only
iOS and Android tablets only (no Windows based devices)
No pop-ups from an iFrame or web resource
No authentication for embedded Office 365 sites
Could cause instability in the client
No Silverlight and image web resources
You can see the full article regarding all limitations here.

If you want to display the HTML page in CRM tablets.There are three steps.
1.Enable web resource in system setting
2.Check crm for tablets in web resource
3.Check CRM for tablets in form webresource properties.

If you have a scenario where this could work for your organization you’ll need to enable the feature under Settings -> Administration -> System Settings and then navigate to the Customizations tab.
Dynamics CRM 2015 Brings HTML Web Resources & iFrames on the Tablet Client
Web Resources
If you’re going to want to use one of the supported types of web resources you’ll also need to enable it for the tablet client. You can do this by opening the web resource from the Customizations area and making sure the ‘CRM for tablets’ option is checked.
Dynamics CRM 2015 Brings HTML Web Resources & iFrames on the Tablet Client
Once you’ve added the web resource to the form the last step is to check the ‘CRM for tablets’ option on the properties.
Dynamics CRM 2015 Brings HTML Web Resources & iFrames on the Tablet Client
Here is a screenshot from an Apple iPad.
Dynamics CRM 2015 Brings HTML Web Resources & iFrames on the Tablet Client
iFrames
If you are looking to use an iFrame should remember to use a HTTPS URL in order for it to show up correctly in the supported tablet clients. Like web resources you will also need to enable it to be displayed on the properties.
Dynamics CRM 2015 Brings HTML Web Resources & iFrames on the Tablet Client
 Dynamics CRM 2015 Brings HTML Web Resources & iFrames on the Tablet Client

Saturday, October 3, 2015

MVC Attributes for Real Time

Introduction

In the last blog post, I discussed SignalR and created a Message watch application through SignalR with database notification.
In my first article, I covered CRUD operation in MVC with MongoDB.
Today, I am going to cover some MVC attributes which can be very useful in development. I am going to cover the below 4 attributes:
  1. BindAttribute
  2. Remote
  3. Handle Error
  4. HiddenInput

Bind Attribute

The purpose of using BindAttribute is to restrict user to assign property values in Strong Typed Model while form posting. When we post a form, then each and every form property binds to the associated model property.
Suppose we have the below model:
public class Employee
{
    public string Name { get; set; }
    public string Email { get; set; }
    public string Address { get; set; }
    public string PhoneNo { get; set; }
}
I have a controller named Employee which has the below two actions:
 [HttpGet]
public ActionResult EmployeeRegister()
  {
    return View();
  }

 [HttpPost]
public ActionResult EmployeeRegister(Employee emp)
  {
    return View();
  }
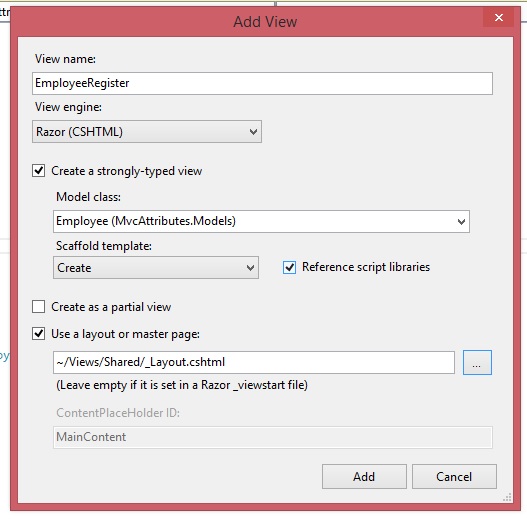
From the first action, I create a view as below:
If we run the app and fill the registration form as below:
If we will post, then in second action method, we will get values as below:
Now if we want to post only Email, Name and PhoneNo, and we don't want to send Address while posting, then we can do this with Bind attribute as below:
[Bind(Exclude="Address")]
   public class Employee
   {
       public string Name { get; set; }
       public string Email { get; set; }
       public string Address { get; set; }
       public string PhoneNo { get; set; }
   }
Bind attribute is available in System.Web.Mvc namespace, so by using Bind attribute, we can add more control on values while posting a form. As per below screenshot, now we will not receive address while posting a form.
In Bind Attribute, we can use the Include and Prefix property also apart from exclude.
We can use the Bind Attribute in Action method also as below:

Remote Attribute

Suppose we have a registration form on which we have an email textbox and while entering email, we want to check whether that email already exists in database or not without posting the complete form. So in such a scenario, we can take the help of Remote Attribute. Through Remote Attribute, we can make a server call without posting the complete form.
We can apply Remote Attribute on that property which we want to check instantly like email in our case:
public class Employee
{
    public string Name { get; set; }

    [Remote("CheckEmail","Employee",ErrorMessage="Email is already exist")]
    public string Email { get; set; }
    public string Address { get; set; }
    public string PhoneNo { get; set; }
}
First parameter is an Action Name, the second is Controller Name and the third one is error message which we want to display if email exists in database. It means whenever user will enter an email in email text box,CheckEmail ActionMethod will get called and check whether email exists or not.
public JsonResult CheckEmail(string Email)
  {
      //Check here in database if it exist in database return true else false.
      return Json(false, JsonRequestBehavior.AllowGet);
  }
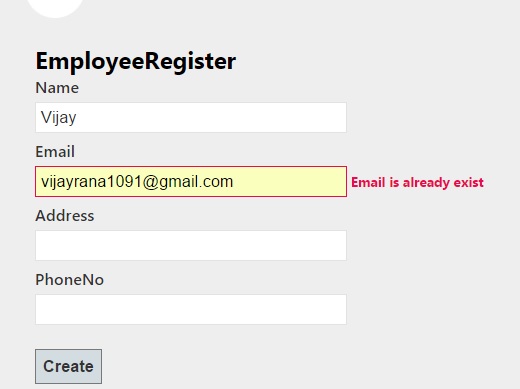
and here is the output:

HandleError Attribute

There are many ways to handle an exception in MVC like normal try catch or through Filter or through third party libraries like elmah. But MVC also provides an attribute to handle exception which works as below:
[HandleError()]
public ActionResult CheckError()
  {
     int a = 10;
     int b = 0;
     int k = a / b;
     return View();
  }
In web.config file, add the below lines:
<customErrors mode ="On" defaultRedirect ="Error.cshtml">
</customErrors>
Create a view named Error.cshtml inside shared folder and run the application. If you will run and call this action method, your Error.cshtml will render in browser.
We can define different view in case of different type of exception in HandleError Attribute as below:
[HandleError(ExceptionType=typeof(DivideByZeroException),View="DivideByZeroErrorView")]
[HandleError(ExceptionType = typeof(NullReferenceException), View = "NullRefrenceErrorView")]
public ActionResult CheckError()
       {
           int a = 10;
           int b = 0;
           int k = a / b;
           return View();
       }

HiddenInput Attribute

If we want to hide some model property from user, then we can take advantage of HiddenInput Attribute.
public class Employee
    {
        [HiddenInput(DisplayValue=false)]
        public string Name { get; set; }

        [Remote("CheckEmail","Employee",ErrorMessage="Email is already exist")]
        public string Email { get; set; }

        public string Address { get; set; }

        public string PhoneNo { get; set; }
    }
In the above model, I decorate Name property with HiddenInput attribute. Now this Name property will not render in browser. So HiddenInput gives us extra control on Model Fields.

Thursday, October 1, 2015

Configure POP3 Mail setting in CRM

Configure POP3 Mail setting in CRM

If you have any doubt in the post please post comments. I will try to solve your problem.

To send mail in CRM. There are two process.

1.Email server profiles setup
2.Configure Mailbox.

In CRM goto  Setting->Email Configuration.

Email server profiles setup
1.We are going  to create a new Email server profiles. Click New button and select POP3-SMTP      Profile.

2.Configure the incoming and outgoing server location with port number.
Here I am get the incoming and outgoing server location and port number from my mail setting.


MailBoxes


1.Either you can create new mail box or edit the existing mail box. Here am going to edit the existing one.


2.Give email address and check yes to "Allow to user credentials for email processing". If it is not         enabled,please check my another post.
3.Give credentials for the email
4.Select the new created Server profiles.
5.Select server side synchronization for incoming and outgoing email and click save button.
6.Click an "Approve the email". Once it approve and click "Test & Enable Mailbox".